Apple released macOS Monterey to the public in the fall, and the new desktop OS brings a whole slew of useful new features and changes to apps like Safari, Maps, FaceTime, Notes, Photos, Messages, and more.
Beyond the headline features, Apple has also made numerous tweaks and changes to macOS that aim to make the time you spend using your Mac more efficient, more functional, and more enjoyable. To that end, we’ve pulled out 40 additions and improvements to Monterey, some of which may have gone under your radar, and we’ve highlighted 20 of them in the video up above. Keep reading to refresh your memory or perhaps learn something new.
1. Click to Save Photos in Messages
There’s a good chance you’ll want to save the photos you receive in the Messages app to your Photos library, and macOS Monterey makes this easier than ever.
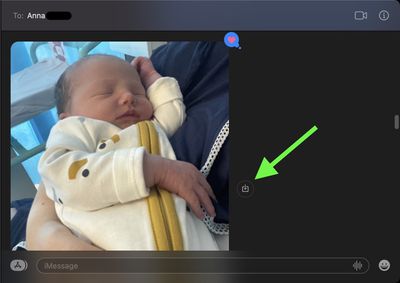
You no longer have to right-click or open the image (or stack of images) to save it. Simply click the Save to Photos button to the right of the image instead.
2. Change Mouse Pointer Color
Apple has made it possible to change the color of the mouse pointer from the standard white outline and black fill, to pretty much any color combination you want.
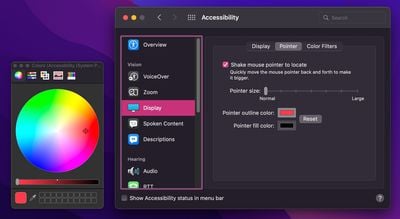

To do so, go to System Preferences -> Accessibility, then click Display (under “Vision”) in the left column. Click the Pointer tab in the window of options, and you’ll find Pointer outline color and Pointer fill color settings. Click the color swatch to choose a custom color from the palette that appears. You can always click Reset to revert to the default colors.
3. Manage APFS Snapshots in Disk Utility
In the macOS Disk Utility app, you now have access to individual APFS drive snapshots. An APFS snapshot is a read-only copy of its parent APFS volume, taken at a particular moment in time, and you can maintain these snapshots and copy items from them, provided you know what you’re doing (see Disk Utility’s Help menu for more).
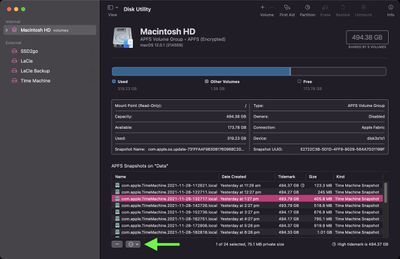

To view them as a list, simply select a volume and choose View -> Show APFS Snapshots from the menu bar. The fixed order list shows you the name, creation date, and cumulative size of each snapshot, while the most recent snapshot has a partition symbol beside its “Tidemark.” Select a snapshot from the list and you can right-click or use the ellipsis button at the bottom left corner of the list to mount the snapshot, rename it, and delete it.
4. Test Network Quality
It’s now possible to measure the quality of your Mac’s internet connection directly from within macOS. Simply open a Terminal window and type networkQuality into the command prompt.
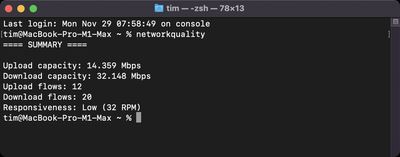

After a short while, you’ll have an upload/download measurement, along with the number of “flows” (test packets) used for the responsiveness (network round trips) test. The upload/download capacity is roughly the same result metric you get from online internet speed tools like Speedtest by Ookla, although it tests upload and download concurrently rather than sequentially.
5. Protect Mail Activity
In the Mail app, a new feature called Mail Privacy Protection prevents senders from using invisible pixels to collect information about you. It does this by preventing senders from knowing when you open their email, and masks your IP address so that it can’t be linked to your other online activity or used to determine your location.


To turn on the feature in Mail, select Mail -> Preferences… in the menu bar, click the Privacy tab, and then check the box next to Protect Mail Activity. If you leave it disabled, you can still independently opt to Hide IP address and Block All Remote Content.
6. AirPlay to Mac
In macOS Monterey, you can AirPlay content from an iPhone or iPad straight to your Mac, or even from one Mac to another Mac. Start playing a song/podcast or video on your iPhone or iPad, tap the AirPlay icon in the app’s media playback interface, and then select your Mac from the list of AirPlay devices.
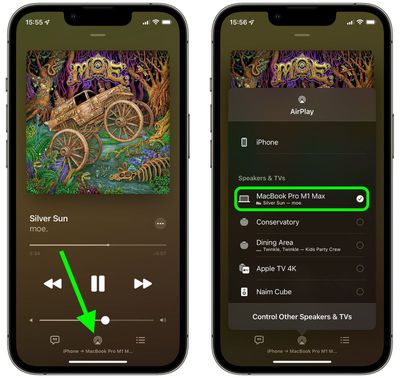

If it’s music or a podcast, the audio should start playing through your Mac’s speakers or any external speakers connected to your Mac, and you can control playback on your Mac by opening the Control Center. Video should automatically play on your Mac’s display in fullscreen mode, and you can control playback directly on your Mac by moving the mouse and selecting the onscreen playback controls.
Note that AirPlay only works on MacBook Air 2018 and later, MacBook Pro 2018 and later, iMac 2019 and later, M1 Mac mini, iMac Pro, and Mac Pro 2019.
7. Hello Screensaver
macOS 12 includes two new screen savers worth checking out. “Hello” is a homage to the original Macintosh that writes the iconic word on the screen in joined-up handwriting, while “Monterey” offers simpler slow transitions through hills and valleys in different shades of pink, purple, and blue.
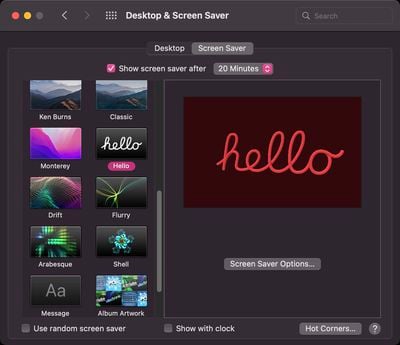

The Hello screen saver cycles through various colors, and there are several themes to choose from including Soft Tones, Spectrum, and Minimal. Soft Tones uses the pastel colors introduced with the new iMacs and matching colored text, while Spectrum uses more saturated shades with lighter text. Minimal shows the “Hello” wording in black, white, and gray.
By default, the screen saver will display “Hello” in multiple languages, but you can force it to use only your native language by toggling off Show ‘hello’ in all languages in the Screen Saver Options. A match system appearance toggle is also available for use to match light and dark mode preferences.
8. Convert Image Quick Action
Convert Image is a new pre-installed Quick Action in Finder that can quickly convert an image file from one format (JPG, HEIC and PNG) to another. It also lets you change the file size (small, medium, large, or actual size) and lets you choose whether to keep the file’s metadata in the converted image.
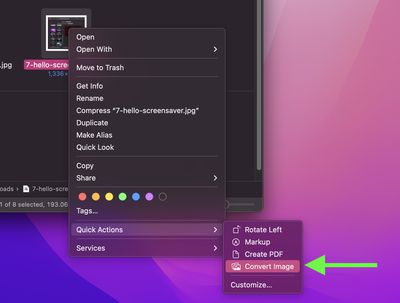

To use the Convert Image Quick Action, right-click (or Ctrl-click) an image file and then select Quick Actions -> Convert Image. Choose your settings in the dialog that appears, then hit Convert. You’ll also see the Quick Action in the Finder preview pane when viewing images.
9. Create a Safari Tab Group
Tab Groups in Safari aim to make organizing and preserving your open browser tabs more manageable without having to have those tabs active. They offer a way to easily save and manage related tabs, such as those used when planning trips or shopping, or groups can be used to store the tabs you visit daily.
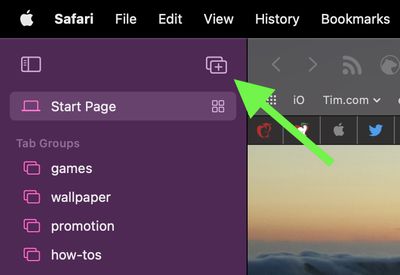

To create a new Tab Group, click the Show Sidebar icon next to the traffic lights and then select New Tab Group. (Alternately, click the down arrow next to the Show Sidebar icon and select either New Empty Tab Group or New Tab Group With X Tabs, “X” being the number of tabs currently open. Any Tab Groups you create are listed in the sidebar for easy switching.
10. Change QuickTime Playback Speed
In macOS, you can now adjust the playback speed of video in Apple’s native QuickTime Player.
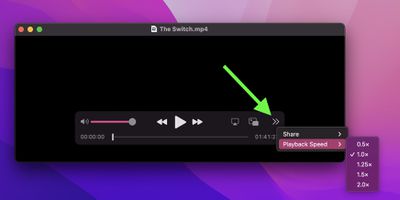

Simply click the chevrons in the bottom-right corner of the media controls overlay and select your preferred speed from 0.5x to 2.0x.
11. Compact Safari Tab Bar
In early beta versions of macOS, Apple introduced a default compact and unified Safari design that did away with the dedicated URL and search interface, instead letting any individual tab be used for navigation input. The design caused an outcry from many users, which led Apple to walk back the change and reinstate the original design in which the URL/search bar sits at the top of the Safari window, with your tabs arranged below it.
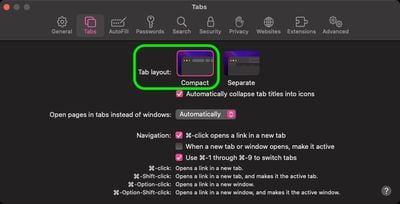

However, if you liked the Compact tab bar design, you can find it as an option in Safari -> Preferences…. Click the Tabs tab and select Tab Layout: Compact to turn on the original compact tab bar that merged everything together.
12. Erase Contents and Settings
Following in the footsteps of the iPhone and iPad, Apple silicon Macs and Intel Macs with a T2 security chip (2017-2020 models) now have an “Erase All Content and Settings” option available in macOS Monterey.
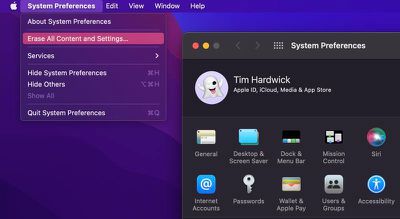

Not only does this effectively erase all user data and user-installed apps from your Mac without reinstalling macOS, it also signs out your Apple ID, removes your Touch ID fingerprints, purchases, and all Apple Wallet items, and turns off Find My and Activation Lock, making it far easier to restore your Mac to like-new factory settings.
Click the Apple () symbol in the menu bar and select System Preferences…. When the preferences pane appears, select System Preferences -> Erase All Content and Settings from the menu bar, and then follow the onscreen instructions provided by the Erase Assistant.
13. Low Power Mode
In macOS Monterey, Low Power Mode reduces the system clock speed and the display brightness of your Mac in order to extend battery life. So if you’re doing less intensive tasks like watching videos or browsing the web, you can turn it on to eke even more out of your Mac’s battery.
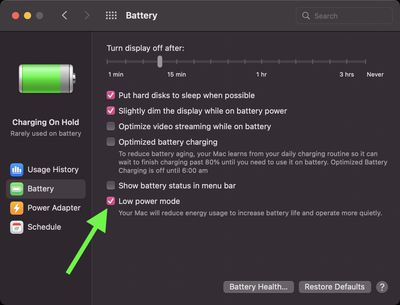

Open System Preferences and click the Battery pane. Then, in the sidebar, select Battery, and check the box next to Low power mode.
In the Messages app, there’s a new “Shared with You” feature that takes content you’ve received in Messages and makes it available in the relevant app on your Mac. So if someone shares an Apple Music song with you, for example, the song will be listed in the For You section of Apple Music. Similarly, if someone shares a website link, it shows up in the “Shared with You” section of the Safari start page.
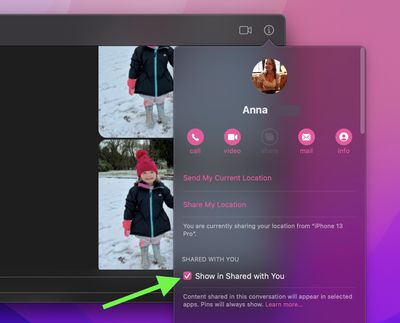

You may not want content shared by a particular person appearing in other apps, in which case you can turn it off for individual contacts. To do so, select the conversation thread in Messages, click the info (i) icon in the top-right corner, and uncheck the box next to Show in Shared with You.
15. Add Links to Quick Notes
Monterey includes a new productivity feature called Quick Notes that offers a quicker way to jot down things without you having to go in and out of the Notes app.
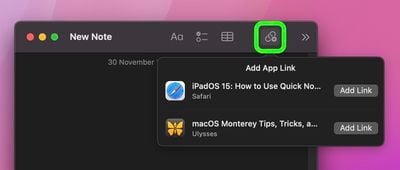

Quick Notes can also detect the app you’re currently using or that you just recently used, and provides a dropdown menu at the top of the editor window from which you can add a link to the specific message you’re viewing in Mail, or the website you were just viewing in Safari, for example. When a note includes such a link, you can just click the link and you’ll be taken directly to the related content.
16. Memoji User Profile
In macOS Monterey, you can use an animated Memoji as your Mac user profile instead of a standard static image. Go to System Preferences -> Users & Groups, and then hover your pointer over the circled profile picture and click edit. There you’ll find a full gallery of Memoji characters, including any you’ve made yourself, and you can customize them in various ways, right down to the frames of their glasses and the clothes they’re wearing.
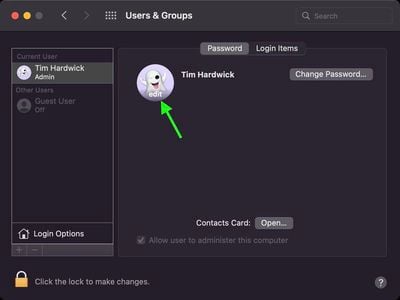

Next time you log in to your Mac, you’ll see your animated Memoji avatar there to welcome you. And if you get your login password wrong a few times, just watch the expression on their face go from mildly irritated to irate. If you leave them hanging, they may even take a nap…
17. Select Text in Quick Look Previews
Invoked with a press of the spacebar, Quick Look is a great way to swiftly preview files in Finder without opening them in their associated app or the dedicated Preview app.
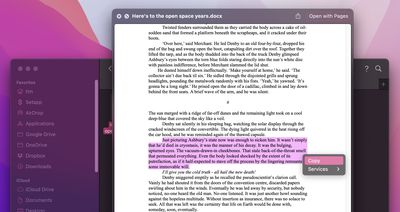

For whatever reason, Apple in previous versions of macOS removed the ability to select text in a document when viewed in Quick Look for copying/pasting elsewhere. In Monterey, however, this ability has quietly, and happily, been reinstated. Not only that, Apple’s Live Text feature means the text you select needn’t be in a document – you can also highlight text displayed in a photo and perform different tasks on it, such as translation and web search.
18. Blur Your Background on a FaceTime Call
In macOS Monterey, Apple has brought several enhancements to FaceTime, including Portrait mode in video calls. With this mode enabled, you can blur your background so that the focus is on you rather than what’s behind you.
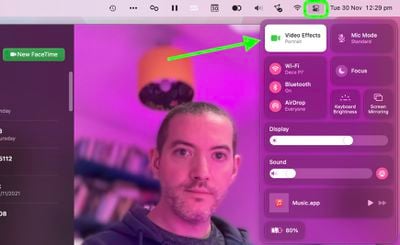

To enable it, open FaceTime, then click the Control Center icon in the menu bar and select Video Effects -> Portrait Mode.
19. Add Shortcuts as Quick Actions
Thanks to the introduction of the Shortcuts app to macOS, you can now add shortcuts as Quick Actions to execute in Finder.
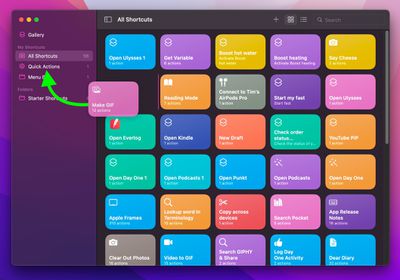

Simply launch the Shortcuts app, and then drag shortcuts from All Shortcuts to Quick Actions in the sidebar. You can then make the shortcuts accessible in Finder’s right-click contextual menu by checking them in System Preferences -> Extensions -> Finder.
20. Maps Interactive Globe
In Monterey, Apple has enhanced the Maps app to include a new globe view that allows you to spin the world around and zoom into different regions on Earth.
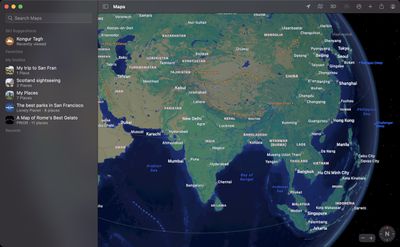

In previous versions of Maps, zooming out would present you with a flat world map, but the new globe view gives you a three-dimensional view of Earth from space that’s a lot more fun to navigate. You can drill down into areas, where you’ll find more detailed information on vast geological features like mountain ranges, deserts, forests, and oceans.
21. FaceTime Links
In Monterey, you can enable anyone, even if they don’t have an Apple device, to join a FaceTime call with you by creating a link to a FaceTime conversation that can be shared anywhere. Using this new link facility, friends and family members who do not have an Apple account can log into a FaceTime call with you using a web browser opened on any non-Apple device, whether that’s a Windows PC or an Android phone.
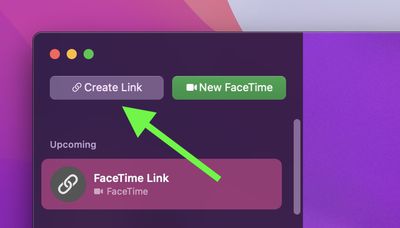

Simply click Create Link in the FaceTime interface, and then select a method of sharing your link from the Actions menu, e.g. over Messages or Mail. Once you’ve sent the link and the recipient opens it, they’ll be directed to a webpage where they can enter their name to join the conversation. Once they’ve joined the call, they’ll have the usual FaceTime options to mute their microphone, disable video, switch the camera view, and leave the call.
22. Spot Mic and Camera Access
When an app is using the camera or the microphone on your Mac, a small indicator light will appear in the menu bar just next to the Control Center icon (if you have the menu bar hidden, it’ll appear in the top-right corner of the desktop).
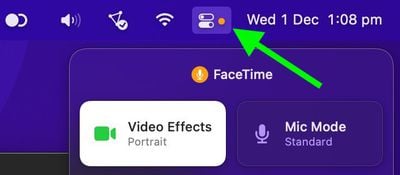

Like in iOS, a green dot means an app is currently using the camera, while an orange dot means an iOS app is currently using the microphone. If you click the Control Center, you’ll see which app is responsible for using the camera or mic. This way, they can’t be accessed in the background without your knowledge, and you can be sure that apps aren’t sneakily recording conversations or videos.
23. Offline Dictation
Keyboard dictation now protects user privacy by performing all processing on-device, meaning it’s completely offline. And thanks to on-device dictation, users can also dictate text of any length without a timeout. On Intel Macs, however, there’s a time limit of 60 seconds.


With keyboard dictation, you can dictate text anywhere you can type it, and the feature improves the more you use it, personalizing over time. The Start Dictation command can be found in the Edit menu of text-based apps.
24. Full Keyboard Access
Apple has expanded its Full Keyboard Access options so that you don’t have to use a mouse or trackpad to use your Mac. These settings can be found in System Preferences -> Accessibility -> Keyboard.
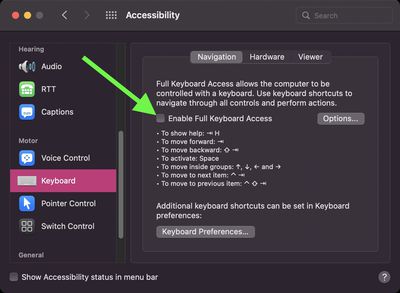

With Full Keyboard Access enabled, the item on the screen that has focus is highlighted. You can customize the color, contrast and size of the highlight using the Options in the Navigation tab. When Full Keyboard Access is turned on, you can quickly show the Full Keyboard Access shortcuts by pressing Tab-H, then using the arrow keys to navigate the lists.
25. View File Path
In Finder, you can now press the Option key while holding the pointer over a file or folder to momentarily show the path bar, so you can easily see where the file or folder is located.
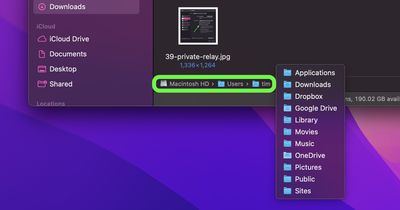

You can also right-click (Ctrl-click) a folder in the path bar to open it in Terminal, or copy the file path to that folder. Lastly, you can also Shift-click a folder to see or navigate to any subfolders in the same directory.
26. Go to Folder Window
It’s easy to miss, but Monterey includes an enhanced version of the Go to Folder menu bar option in Finder (Go -> Go to Folder…).
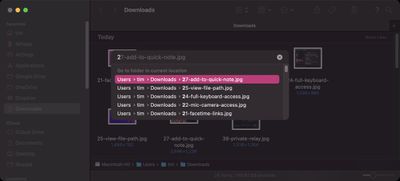

Instead of a dialog, the command brings up a Spotlight-style floating search bar that features a vastly improved auto-complete engine and even a Recents list.
27. Add to Quick Note
We’ve already mentioned Quick Notes’ ability to include links to emails, web URLs, and so on. But the New Quick Note command deserves special mention when used in conjunction with Safari.
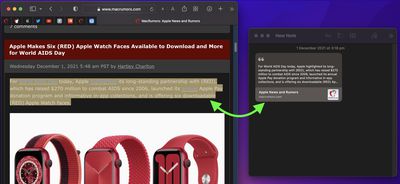

Highlight some webpage elements, such as text and images, then right-click (Ctrl-click) and select New Quick Note/Add to Quick Note. Now, the next time you click the captured elements in the Quick Note you created, you’ll be taken to the original webpage with the highlighted elements still there. You can also reopen the note by clicking on your highlights.
28. View Shared iCloud Files in Finder
There’s a new Shared collaboration folder for the Finder sidebar, where you can easily find documents shared with you over iCloud or using the collaboration features in Apple’s productivity apps. It can display information such as invitation status, the person who last modified the file, and other sharing-related metadata to help you manage your shared files.
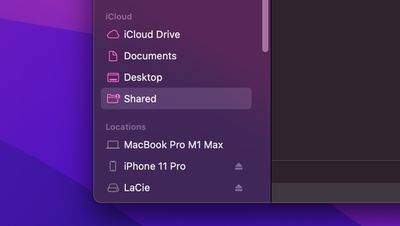

To add/remove the iCloud Shared folder to the Finder sidebar, select Finder -> Preferences…, click the Sidebar tab, and then click the checkbox next to (iCloud) Shared.
29. Automate a Focus Mode for Specific Apps
Apple’s new Focus feature in Monterey lets you set up your Mac to help you be in the moment and zone in on a single thing. It does this by filtering notifications based on what you’re doing, and you can customize Focus modes for specific scenarios, such as when you open particular apps.
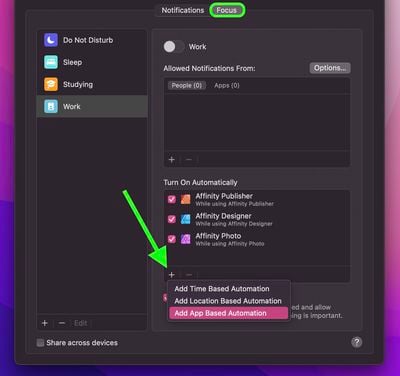

When setting up a Focus mode in System Preferences -> Notifications & Focus, click the + button at the bottom of the box labeled Turn On Automatically, and then select Add App Based Automation. You’ll then be prompted to select which apps automatically turn on the Focus mode upon launching.
30. Right-click to Translate Text
The Translate feature from Safari is available system-wide in macOS Monterey. Just select some text and right-click (Ctrl-click) to bring up the Translate option, which works with several languages.
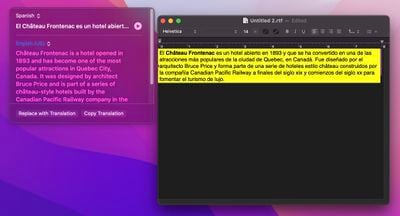

Not only can you read and copy the translated text, click the play button and you can get macOS to say it out loud to you so that you can better understand the verbal pronunciation.
31. Change Playback Speed and Skip Silences in Voice Memos
Apple has added a couple of welcome features to the Voice Memos app. You can now opt to automatically skip silences in recordings during playback, and also change the playback speed.
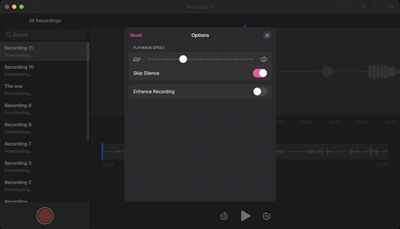

Simply select an audio recording, click the controls icon in the top-right corner of the window, and you’ll find both settings under “Playback Speed.”
32. Spatialize Stereo Effect
Apple has included a new audio feature called “Spatialize Stereo” that takes any non-Dolby stereo mix and creates a virtual spatial audio environment out of it. To access it, connect a pair of AirPods Pro or AirPods Max headphones to your Mac and start playing some audio. Next, click the Control Center icon in the menu bar, and then click the Sound volume bar. You should see the option to Spatialize Stereo in the dropdown beneath your headphones.
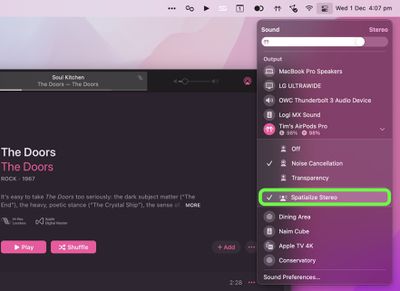

Note that Spatialize Stereo is different from Spatial Audio. Spatial Audio with support for Dolby Atmos creates a three-dimensional experience by moving sound all around you. Spatialize Stereo on the other hand is Apple’s attempt to simulate the effect of having sound coming at you from different directions in a virtual environment. It doesn’t utilize Dolby Atmos, but it works with basically any content.
33. Automatic Window Resizing
Monterey is a lot more display-aware than previous versions of macOS, and will automatically resize a window to fit a secondary screen. This means you don’t need to manually reduce the size of a window to fit it onto a smaller display, for example.
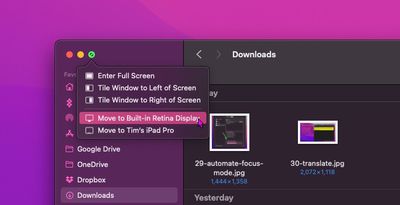

The automation works both when you drag a window manually to another display or click-hold on the green traffic light in the top-left corner of the window to select another connected display. Note that the window options in the green traffic light menu also include tiling windows for hassle-free Split View management when working with two apps open side by side.
In previous versions of macOS, launching an app in fullscreen mode automatically hides the menu bar, which means that you have to hover the mouse pointer over the top of the screen to reveal it. However, in Monterey, you can force the menu bar to always remain visible in fullscreen mode, along with all its menus and items.
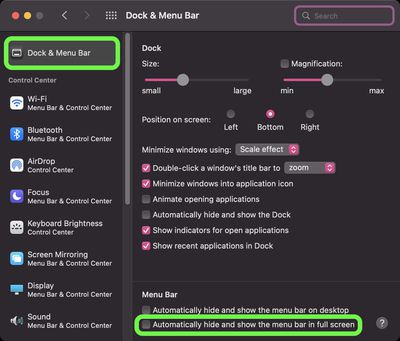

To do so, go to System Preferences -> Dock & Menu Bar, and in the Dock & Menu Bar options, uncheck the box next to Automatically hide and show the menu bar in full screen.
35. Import Photo Libraries
The Photos app has been updated in Monterey to enable the importing of photos from another Photos library. To do so, select File -> Import… from the menu bar to bring up a file browser window.
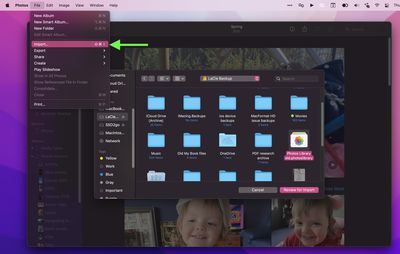

Once you’ve selected the Photos library, you can review its contents before importing it into your main library.
With the Shortcuts app coming over to Mac from iOS, you can now add specific shortcuts to different parts of macOS. We’ve already mentioned that you can make them available as Quick Actions in Finder, but you can add them to your menu bar, too.
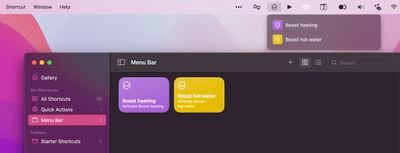

When you’ve dragged some shortcuts into the Menu Bar section of the Shortcuts app, a new menu item will appear in the menu bar listing those shortcuts, allowing you to control HomeKit devices from your desktop, for example.
37. Change MacBook Pro Refresh Rate
If you have a 14-inch or 16-inch MacBook Pro, you can adjust the refresh rate of the Liquid Retina XDR display, which is useful if you want to match it to video content you might be editing.
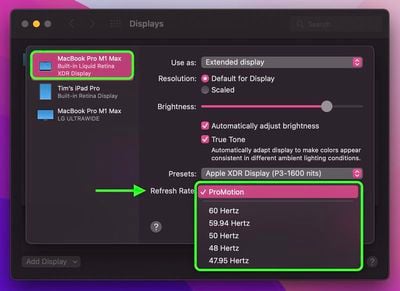

Go to System Preferences -> Displays, and then click the Display Settings… button. If you’re using an external monitor, select your MacBook Pro’s built-in Liquid Retina XDR display in the side column, then click the dropdown next to Refresh Rate and choose from the following: 120Hz (ProMotion), 60 Hertz, 59.94 Hertz, 50 Hertz, 48 Hertz, and 47.95 Hertz.
Both the Reminders and Notes apps support tags, a much-requested feature that means you can now use hashtags to help you organize your notes and reminders and find stored notes and to-dos more easily.
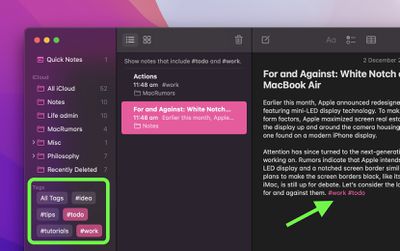

Tags can be a powerful method of organization, because there’s no limit to how many you can have, and a single note or reminder can include multiple tags, so the same note/reminder can show up in different tagged categories that you’ve created (something Smart Folders are useful for generating). Also, when you input a hash symbol, macOS will conveniently suggest existing tags for you to pick below the cursor.
39. Turn On Private Relay
In Monterey, Apple introduced iCloud Private Relay for Mac, a feature of all iCloud+ paid plans that’s designed to encrypt all of the traffic leaving your computer so no one can intercept it or read it.
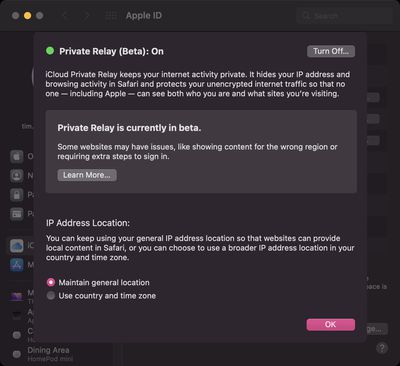

Private Relay works by sending web traffic to a server that is maintained by Apple to strip the IP address. Once the IP info has been removed, Apple sends the traffic to a second server maintained by a third-party company that assigns a temporary IP address and then sends the traffic to its destination, a process that prevents your IP address, location, and browsing activity from being used to create a profile about you.
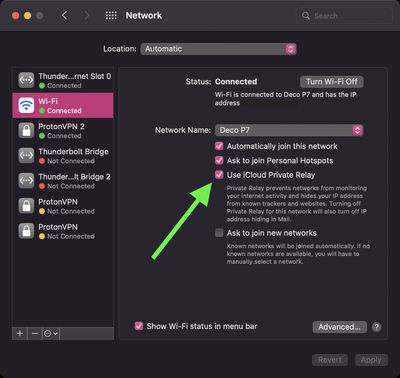

The checkbox to enable Private Relay can be found in System Preferences -> Apple ID, and you can also turn it on and off for individual networks in the Network preference pane (shown above). Once iCloud Private Relay is enabled, you can choose how the assigned IP address uses geographical information to conceal your actual location. If you still want to receive local content when you’re browsing in Safari, the IP address can maintain your general location without being specific (the default setting), or if you want the relay to be more private, the IP address can simply include your country and time zone.
40. Resume Copy in Finder
In Finder, Apple has made it easier to know how long copying files will take, thanks to a new pie chart progress indicator. What’s more, it’s also added the ability to start or pause a long copy and resume it at a later time.
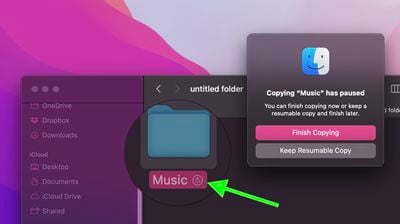

If you cancel a copy midway through, a ghosted version of the file or folder will remain in the destination location. Just click it and you’ll be given the option to Finish Copying it, or you can Keep the Resumable Copy for finishing the transfer at a later time.
